
To send automatic emails on user sign up in Shopify store, you need to set up email automation. This involves configuring your Shopify settings and possibly using third-party apps.
Email automation is a powerful tool for online stores. It helps you engage with new customers immediately. When a user signs up on your Shopify store, sending a welcome email makes a good first impression. It also increases the chances of retaining that customer.
In this blog post, we will guide you through the steps to set up automatic emails. We will cover both Shopify’s built-in features and recommended third-party apps. By the end, you’ll be ready to create a seamless welcome email experience for your new users. Let’s get started!
Setting Up Your Shopify Store
Setting up automatic emails for new users on your Shopify store enhances customer engagement. Use Shopify’s built-in features or third-party apps to send welcome emails effortlessly. Keep your customers informed and connected from the moment they sign up.
Starting a Shopify store is an exciting venture. Before you can send automatic emails, you need to set up your store correctly. This involves creating an account and configuring your store settings. Let’s break it down step by step.
Creating A Shopify Account
First, visit the Shopify website. Click the “Start Free Trial” button. Enter your email address, a password, and your store name. Shopify will guide you through a few questions. These questions help personalize your store settings. Once completed, your Shopify account is ready.
Configuring Store Settings
Next, configure your store settings. Go to the Shopify admin dashboard. Click on “Settings” at the bottom left. Fill out your store details like address and contact information. Set up payment gateways under “Payments”. This allows customers to pay you. Configure shipping rates under “Shipping and Delivery”. These settings ensure smooth transactions.
Finally, review your tax settings. Shopify can calculate taxes automatically. Make sure they are set up correctly. Now your store is ready for the next steps. You can start selling and sending automatic emails to new users.
“`
Credit: www.pabbly.com
Choosing An Email Marketing Service
Sending automatic emails on user sign-up can be a game-changer for your Shopify store. The right email marketing service helps streamline this process. It ensures that your users receive a welcome email as soon as they sign up. This initial interaction sets the tone for your relationship with your customers.
Choosing the right email marketing tool is crucial. It can impact how effectively you engage with your customers. Below are some popular tools and factors to consider.
Popular Email Marketing Tools
Several email marketing tools are available. Each offers different features. Some popular options include:
- Mailchimp: Known for its ease of use and integration with Shopify.
- Klaviyo: Offers detailed analytics and strong automation features.
- Omnisend: Great for eCommerce, offering multi-channel marketing.
- Constant Contact: User-friendly and offers excellent customer support.
Factors To Consider
When choosing an email marketing service, consider these factors:
- Integration: Ensure the tool integrates seamlessly with Shopify.
- Ease of Use: The tool should be easy to set up and use.
- Automation Features: Look for robust automation capabilities.
- Analytics: Detailed analytics help you track email performance.
- Customer Support: Reliable support can save you time and trouble.
Choose a service that aligns with your business needs. This will help you engage with your customers effectively.
Integrating Email Service With Shopify
Integrating an email service with your Shopify store is essential. It helps you send automatic emails when users sign up. This process ensures that your customers receive welcome emails and other important notifications. Let’s break down the steps to make this happen.
Connecting Your Email Tool
First, choose an email service that fits your needs. Popular choices include Mailchimp, Klaviyo, and Sendinblue. Sign up for an account if you don’t have one.
Then, navigate to the Shopify admin dashboard. Go to Apps and click on Visit Shopify App Store. Search for the email tool you chose. Click on the app and select Add app. Follow the prompts to install the app on your Shopify store.
Next, open the app from your Shopify admin. You’ll need to connect your Shopify store with the email service. Typically, this involves logging into your email service account and authorizing the connection. This step allows the email tool to access your store data.
Setting Up Api Keys
API keys are crucial for secure communication between Shopify and your email tool. To set up API keys, log in to your email service account. Look for the API settings, usually found in the account or settings menu.
Generate a new API key. Copy this key, as you’ll need it for Shopify. Now, return to your Shopify admin dashboard. Open the installed email app. You’ll see a prompt asking for the API key. Paste the copied key into the field provided.
Verify the connection to ensure it’s active. This step ensures that your email tool can send emails based on user actions in your Shopify store. You might also need to configure additional settings, such as email templates and automation rules, within the email service.
| Step | Action |
|---|---|
| 1 | Choose an email service |
| 2 | Install the email app on Shopify |
| 3 | Connect the email service to Shopify |
| 4 | Generate and enter API key |
| 5 | Verify the connection |
Following these steps will help you integrate an email service with your Shopify store. This integration allows you to automate emails, improving customer engagement and communication.

Credit: apps.shopify.com
Designing Your Welcome Email
Designing your welcome email is crucial. It’s the first impression new users get of your brand. A well-designed email can boost user engagement and loyalty. Let’s dive into how you can create an effective welcome email.
Crafting The Email Content
Your email content should be clear and concise. Use simple language to convey your message.
- Greeting: Start with a warm greeting. Personalize it if possible.
- Introduction: Introduce your brand briefly. Mention what makes it unique.
- Thank You: Thank the user for signing up. Show appreciation.
- Next Steps: Guide them on what to do next. Include links to popular products or articles.
Keep paragraphs short. Use bullet points to highlight key information. This makes the email easy to read.
Choosing Templates And Designs
Select a template that aligns with your brand’s aesthetics. Shopify offers various email templates. Customize them to match your brand colors and fonts.
| Template Feature | Importance |
|---|---|
| Responsive Design | High |
| Brand Colors | Medium |
| Clear Call-to-Action | High |
Ensure the template is mobile-friendly. Many users check emails on their phones. A responsive design improves user experience.
Use images sparingly. They should support the text, not overwhelm it. Ensure images are high quality and relevant.
By following these tips, you can create a welcome email that engages new users. This sets a positive tone for their journey with your brand.
Setting Up Triggers For Automatic Emails
Setting up triggers for automatic emails in your Shopify store can greatly enhance your customer engagement. Automatic emails help you stay connected with your users and provide them with important information. This guide will walk you through defining user actions and configuring triggers in Shopify for sending these emails.
Defining User Actions
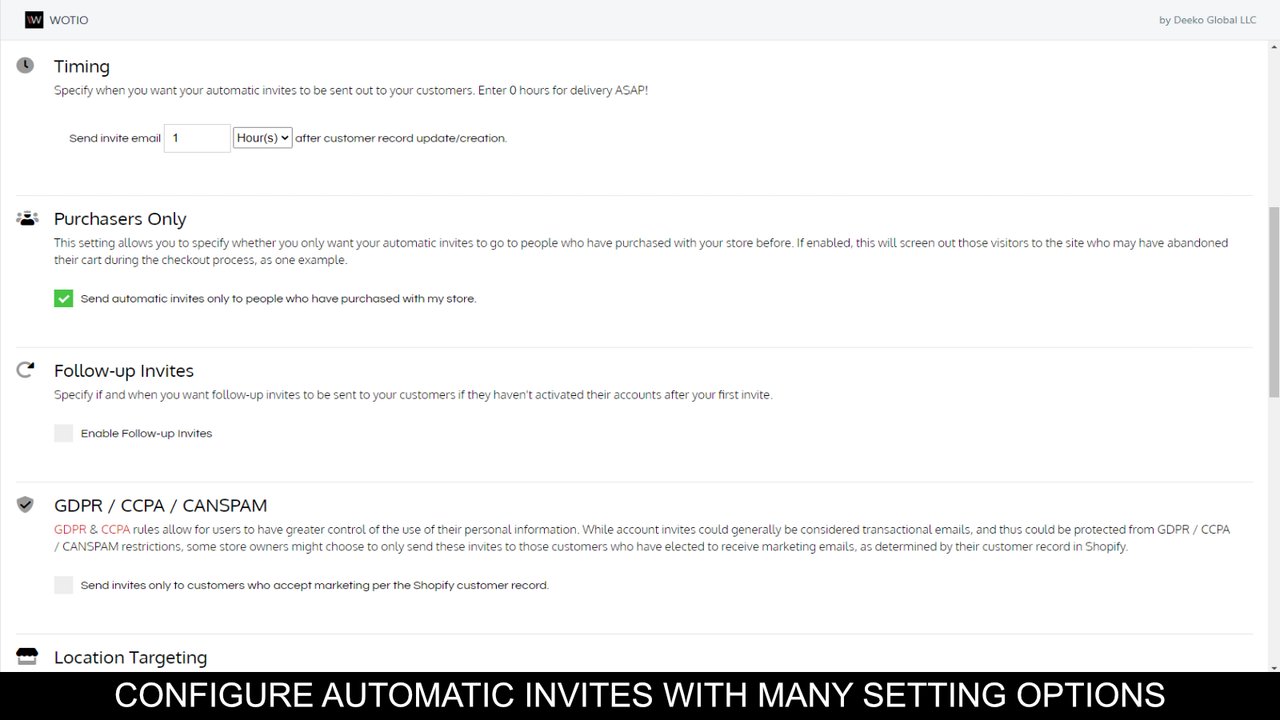
First, identify the key actions that should trigger an email. Common actions include user sign-ups, purchases, or abandoned carts. Knowing these actions helps you set specific conditions for your emails. For instance, you might want an email sent when a user signs up or completes a purchase.
Consider what information users need after these actions. New users might need a welcome email with account details. Purchasers could receive a thank you email with order details. Mapping out these actions ensures each email serves a clear purpose.
Configuring Triggers In Shopify
Next, you need to set up these triggers in Shopify. Go to your Shopify admin panel and navigate to the “Settings” section. From there, select “Notifications.” Here, you can create new email notifications based on the user actions you defined earlier.
Choose the trigger action, like “Customer account created.” Customize the email content to match the action. Use variables like the customer’s name for a personalized touch. Save your changes and test the trigger to ensure it works correctly.
Repeat this process for each user action you identified. Carefully set up each trigger to cover all necessary scenarios. This ensures your users receive timely and relevant emails.
Testing Your Automatic Email Workflow
Testing your automatic email workflow is crucial. It ensures your Shopify store sends the right emails at the right time. A successful test confirms your setup works flawlessly. This step can save you from potential issues.
Running Test Scenarios
Begin by creating a test user account on your Shopify store. Use a unique email address for testing. This helps simulate a real user sign-up.
Sign up using this test account. Observe the process closely. Make sure every step functions correctly. Check if the automatic email is sent. Review the email content and timing. Note any irregularities for further analysis.
Analyzing Test Results
After running your tests, review the outcomes. Did the email reach the inbox? Check for any delays. Ensure the content is correct.
Identify any issues. Look for broken links or incorrect information. Test on different devices and email clients. This ensures compatibility and readability across platforms.
Address any problems you find. Make necessary adjustments in your email settings. Run the test again until results meet your expectations. This thorough approach guarantees a smooth user experience.
Monitoring And Optimizing Email Campaigns
Monitoring and optimizing email campaigns is vital for the success of your Shopify store. It helps you understand user behavior, refine your strategy, and boost engagement. Here’s how you can effectively track and improve your email campaigns.
Tracking Email Performance
Tracking the performance of your emails is crucial. Use Shopify’s built-in analytics tools. These tools provide valuable insights into your email campaigns.
- Open Rates: Check how many users open your emails. High open rates indicate interest.
- Click-Through Rates (CTR): Measure how many users click on links within your emails.
- Conversion Rates: Track how many users complete a purchase after clicking on email links.
- Bounce Rates: Monitor how many emails fail to reach recipients.
- Unsubscribe Rates: Keep an eye on how many users unsubscribe from your emails.
| Metric | Importance |
|---|---|
| Open Rate | Shows user interest |
| Click-Through Rate | Indicates engagement |
| Conversion Rate | Measures success |
| Bounce Rate | Indicates deliverability issues |
| Unsubscribe Rate | Shows user disinterest |
Implementing Improvements
Once you have tracked your email performance, it’s time to make improvements.
- A/B Testing: Test different email elements. Change subject lines, content, and call-to-action buttons.
- Personalization: Use customer names and personalize content based on user behavior.
- Segmentation: Divide your email list into smaller segments. Send targeted emails to each segment.
- Timing: Experiment with sending emails at different times. Find the best time for engagement.
- Mobile Optimization: Ensure your emails look good on mobile devices.
Regularly reviewing and adjusting your strategy will enhance your email campaigns. This will lead to higher engagement and increased sales.
Credit: apps.shopify.com
Frequently Asked Questions
How To Enable Automatic Emails On Shopify?
To enable automatic emails, go to your Shopify admin. Navigate to Settings > Notifications. Customize the templates. Save the changes.
Can I Customize Signup Email Templates?
Yes, Shopify allows you to customize email templates. Go to Settings > Notifications. Edit the “Customer account welcome” template.
What Email Service Can I Use With Shopify?
You can use services like Mailchimp, Klaviyo, or Shopify’s built-in email system for automatic emails.
Are There Apps For Automatic Emails In Shopify?
Yes, Shopify App Store has various apps like Klaviyo, Omnisend, and Seguno for automatic email workflows.
Conclusion
Sending automatic emails on user sign-up in Shopify is simple. Follow the steps discussed in this guide. Your customers will feel welcomed. It improves user experience and boosts engagement. Remember to personalize your emails. Keep them relevant and friendly. Testing your email automation ensures everything works smoothly.
This small effort can lead to satisfied customers. Happy selling!
