
Adding new Mailchimp subscribers to Google Sheets can streamline your workflow. This integration helps keep your subscriber data organized and accessible.
Managing email lists is crucial for any business. But manually updating subscriber details can be time-consuming. Integrating Mailchimp with Google Sheets simplifies this process. It allows automatic updates to your spreadsheet when new subscribers join your list. This saves time and reduces errors.
With this setup, you can easily analyze and manage your subscriber data in one place. It’s a practical solution for efficient email marketing. In this guide, you will learn the steps to seamlessly add new Mailchimp subscribers to Google Sheets rows. Let’s dive into this simple yet effective integration process.
Setting Up Mailchimp
Mailchimp is a powerful tool for managing email marketing campaigns. Setting up Mailchimp is essential for growing your email list and engaging with your audience. Follow these steps to get started with Mailchimp and learn how to add new subscribers to Google Sheets.
Creating An Account
First, you need a Mailchimp account. Visit the Mailchimp website and click on the Sign Up Free button. Fill in your email, username, and password. Click Get Started.
After creating your account, you will receive a confirmation email. Open the email and click on the confirmation link. This will verify your account and take you to the Mailchimp dashboard.
On the dashboard, fill in your company details and mailing address. These are required for compliance with email marketing laws.
Building An Email List
Now, you need to build your email list. Go to the Audience section in Mailchimp. Click on Create Audience if you do not have one.
Enter the required information such as audience name, default email address, and default name. This information will appear in your emails.
After creating your audience, you can add subscribers manually. Click on Add Contacts and select Add a Subscriber. Enter the subscriber’s email, first name, and last name.
| Field | Description |
|---|---|
| Email Address | The subscriber’s email address |
| First Name | The subscriber’s first name |
| Last Name | The subscriber’s last name |
You can also import subscribers from a file or another service. Click on Import Contacts and choose your method of import.
To automate this process, you can integrate Mailchimp with Google Sheets. This will automatically add new subscribers to your Google Sheets rows.
Creating A Google Sheet
Creating a Google Sheet is the first step to adding new Mailchimp subscribers to Google Sheets rows. This process is simple and helps keep your subscriber data organized. Here, we will guide you through setting up columns and sharing access to your Google Sheet.
Setting Up Columns
First, open Google Sheets and create a new sheet. Label your columns according to the data you want to capture. Common columns include “Name,” “Email,” “Subscription Date,” and “Source.” Keep column names clear and concise. This makes it easier to identify and manage data.
If you need more columns, add them now. Think about any additional information you may want to track. Ensure that each piece of data has its own column. This setup helps maintain an organized structure.
Sharing Access
Next, share access to your Google Sheet. Click on the “Share” button in the top right corner. Enter the email addresses of the people you want to share the sheet with. Choose their permission level: View, Comment, or Edit.
If you want others to only see the data, choose “View.” For collaboration, select “Edit.” This allows others to add or modify data as needed. Make sure to save your changes after setting permissions. Now, your Google Sheet is ready for use.
Using Zapier For Integration
Adding new Mailchimp subscribers to Google Sheets rows can be simplified using Zapier. This integration automates the process, saving you time and effort. No need for manual updates. Zapier handles everything seamlessly, ensuring your data is always up-to-date. Let’s explore how to set up this integration.
What Is Zapier?
Zapier is an online tool that connects different apps and automates workflows. It helps you create automated actions, called Zaps, between your apps. For example, adding new Mailchimp subscribers to Google Sheets. You don’t need to know any coding. Zapier’s interface is user-friendly and intuitive. You can set up integrations in minutes.
Connecting Mailchimp And Google Sheets
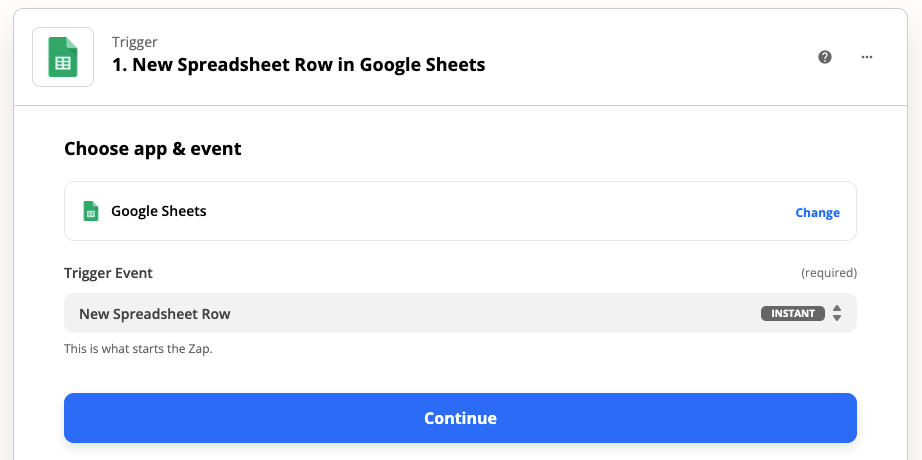
First, log in to your Zapier account. If you don’t have one, sign up for free. Next, click on “Make a Zap.” Choose Mailchimp as the trigger app. Select the trigger event, such as “New Subscriber.” Connect your Mailchimp account to Zapier. Zapier will guide you through the authentication process.
Once connected, choose Google Sheets as the action app. Select the action event, like “Create Spreadsheet Row.” Connect your Google Sheets account to Zapier. Again, follow the steps to authenticate. Choose the specific spreadsheet and worksheet where you want to add the data.
Map the Mailchimp subscriber fields to the corresponding Google Sheets columns. This ensures the correct data gets transferred. Test the Zap to check if everything works. If successful, turn on the Zap. Now, every new Mailchimp subscriber will automatically be added to your Google Sheets.
Configuring The Trigger
Configuring the trigger is a crucial step in automating the process of adding new Mailchimp subscribers to Google Sheets. This involves selecting the right Mailchimp event and setting up specific conditions. These steps ensure that the trigger works correctly and efficiently. Let’s break down these tasks.
Choosing Mailchimp Event
First, you need to choose the Mailchimp event that will activate the trigger. Log in to your Mailchimp account and navigate to the “Integrations” section. Here, you can choose events such as “New Subscriber” or “Email Opened.” For this task, select the “New Subscriber” event. This means each new subscriber will be added to your Google Sheets automatically.
Setting Up Trigger Conditions
After choosing the event, set up the conditions that the trigger must meet. For example, you might want to add subscribers only from specific campaigns. To do this, specify your conditions in the trigger settings. You can filter by campaign name or list ID. These conditions help ensure that only relevant data is added to your Google Sheets.
These steps make sure your automation runs smoothly. With the right Mailchimp event and conditions, your Google Sheets will always be up-to-date with new subscriber information.
Setting Up The Action
Integrating Mailchimp with Google Sheets can streamline your workflow. It helps you automatically add new subscribers’ data into a spreadsheet. This ensures you stay organized and up-to-date with your email lists. Let’s dive into setting up the action for this integration.
Selecting Google Sheets
First, open your integration platform. Choose Google Sheets as the action app. Connect your Google account if prompted. This will grant access to your spreadsheets. Select the specific spreadsheet where you want the data to go. Ensure the spreadsheet has headers for each data field.
Mapping Data Fields
Next, map the Mailchimp fields to your Google Sheets columns. Match each field from Mailchimp, such as email, first name, and last name, to the corresponding column in your sheet. This step is crucial for accurate data entry. Double-check the mappings to avoid errors. This ensures that all subscriber information is correctly logged.

Credit: zapier.com
Testing The Integration
After setting up your integration to add new Mailchimp subscribers to Google Sheets rows, testing the integration is crucial. This ensures everything works smoothly and data transfers without issues. Let’s dive into how to test your integration effectively.
Running Initial Tests
Begin by creating a test subscriber in Mailchimp. Use a unique email address to avoid confusion. Add this test subscriber to the list you linked with Google Sheets.
Check your Google Sheet. The new subscriber should appear in a new row. Verify that all relevant fields are correctly populated.
If the test subscriber data shows up correctly, your integration works as expected. Remember to delete any test data from your Google Sheets to keep it clean.
Troubleshooting Common Issues
Sometimes, the integration might not work perfectly on the first try. If the new subscriber does not appear in Google Sheets, check your connection settings. Ensure Mailchimp and Google Sheets are properly linked.
Confirm that you have given the necessary permissions. Both tools need access to share data. If permissions are restricted, data transfer will fail.
Examine your integration settings for any errors. Small mistakes in configuration can cause problems. Correct any issues you find and run another test.
Lastly, check for any network issues. A stable internet connection is essential for smooth data transfer. If problems persist, consider reaching out to Mailchimp or Google Sheets support for help.
Maintaining The Workflow
Add new Mailchimp subscribers to Google Sheets rows easily. Automate your workflow with simple integration steps. Keep your subscriber data organized and up-to-date.
Maintaining the workflow is crucial for keeping your data organized. It ensures your new Mailchimp subscribers are accurately added to your Google Sheets. Proper workflow management saves time and prevents errors. This involves regular updates and monitoring the integration.
Regular Updates
Regular updates are vital for a smooth workflow. They ensure your Google Sheets have the latest subscriber data. Check your Mailchimp and Google Sheets integration often. Make sure no new subscribers are missed. This way, your data stays current and accurate.
Set a routine to update your Google Sheets. You can do this daily or weekly. This helps in catching any discrepancies early. It also keeps your team informed about new subscribers. Consistent updates lead to better decision-making.
Monitoring Integration
Monitoring the integration between Mailchimp and Google Sheets is important. This helps in identifying and fixing issues quickly. Watch for any errors in data transfer. This ensures that all subscriber information is correctly added.
Use tools or set alerts to monitor the integration. This makes it easier to track any problems. Regular checks ensure everything works as expected. A well-monitored integration maintains a reliable workflow. Your data stays precise and up-to-date.
“`

Credit: www.make.com
Frequently Asked Questions
How Do I Connect Mailchimp To Google Sheets?
To connect Mailchimp to Google Sheets, use third-party tools like Zapier. These tools automate the process. They sync new subscribers directly to Google Sheets.
Can I Automate Mailchimp To Google Sheets?
Yes, automation is possible. Tools like Zapier allow you to automatically add new Mailchimp subscribers to Google Sheets.
Which Tools Integrate Mailchimp With Google Sheets?
Popular tools include Zapier, Integromat, and Automate. io. These tools facilitate seamless integration between Mailchimp and Google Sheets.
Is It Free To Sync Mailchimp With Google Sheets?
Some tools offer free plans with limited features. For more advanced features, a paid subscription might be required.
Conclusion
Syncing Mailchimp subscribers to Google Sheets is straightforward and beneficial. This guide simplified the steps for you. Now, your data stays organized and updated. Regular updates save time and reduce manual work. Follow these steps, and you’ll streamline your workflow.
Keep your subscriber list accurate and current. Happy syncing!
